Fail2Ban is an intrusion prevention framework written in Python that protects Linux systems and servers from brute-force attacks. We can set up Fail2Ban to provide brute-force protection for SSH on our server, this will ensure that the server is secure from brute-force attacks and it also allows us to monitor the strength of the brute-force attacks in regards to the number of authentication attempts that are being made.
Brute-force attacks can be extremely powerful and may result in thousands of failed authentication attempts per day, it is, therefore, vital to understand how to protect your server from these attacks and how to block IP addresses. Fail2Ban allows us to automate the process of blocking brute-force attacks by limiting the number of failed authentication attempts a user can make before being blocked. This is extremely useful for servers that have user accounts that utilize passwords for remote authentication as opposed to SSH key-pair authentication.
Installing And Configuring Fail2Ban
Fail2Ban is free to use and can be installed through most of the popular package managers, in this case, we are setting up Fail2Ban on the Ubuntu server, so we can easily install Fail2Ban by running the following commands:
[simterm] $ sudo apt-get install fail2ban [/simterm]
You should also ensure that Fail2ban runs on system startup, this can be done by using the following command:
[simterm] $ sudo systemctl enable fail2ban.service [/simterm]
After the installation is complete we can begin configuring Fail2Ban to set up a jail for our SSH server. The Fail2Ban configuration files are located in the /etc/fail2ban directory, as shown in the image below.

Fail2Ban will use the default configuration in the jail.conf file, however, it is not recommended to use the default configuration files as they can be overwritten by newer updates to the Fail2Ban package.
The preferred approach to creating configurations for a particular service is by creating a new configuration file in the /etc/fail2ban directory with the .local extension.
Creating SSH Jails With Fail2Ban
We can begin by creating a new file within the same directory called jail.local, we can then add the necessary security configurations for the sshd jail.
[simterm] $ sudo nano /etc/fail2ban/jail.local [/simterm]
We can explore the options that Fail2Ban provides to us to customize the security and blocking of the SSH service.
Configurations |
Function |
| enabled | Jail status (true/false) – This will enable or disable the jail |
| port | Port specification |
| filter | Service-specific filter (Log filter) |
| logpath | What log to be used |
| maxretry | Number of attempts to be made before a ban |
| findtime | Amount of time between failed login attempts |
| bantime | Number of seconds an IP will be banned for |
| ignoreip | IP to be whitelisted |
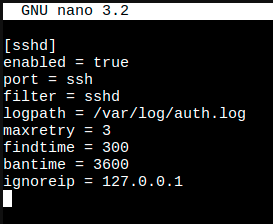
With the information in the table above, we can create a jail configuration for OpenSSH server (sshd), Once you have entered the configuration options the values we will be assigned are listed in the image.
After you have specified the configuration options you want to use and their respective values, we can save the file and restart the Fail2Ban service with the following command:
[simterm] $ sudo systemctl restart fail2ban.service [/simterm]
After restarting the OpenSSH server service, Fail2Ban will use this new configuration and the jail for the sshd service will be activated and running. We can now test this functionality by re-enabling “PasswordAuthentication” in the OpenSSH configuration file found in /etc/ssh/sshd_config. We can do this by changing the value from “no” to “yes”.

Testing Fail2Ban
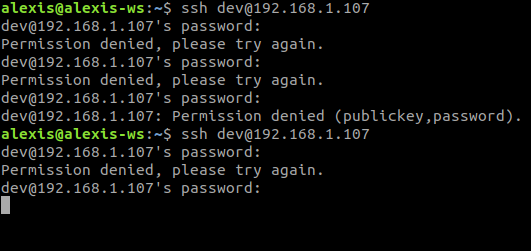
We can easily test this by attempting to login into the dev account with an incorrect password 3 times, after which we will be blocked from authentication for an hour.
![]()
As you can see in the image above, after 3 consecutive failed attempts, Fail2Ban kicks in and actively block the SSH connection, after which the connection will timeout and the user will be blocked for the specified time. If we try connecting again within the period in which we have been blocked, we can see that we get a “Connection refused” error, and we are not able to establish an SSH connection to the server.
This demonstrates the power and robust nature of Fail2Ban and how it can be used to create elegant and effective firewalls for services like SSH. You can customize your service jails to meet your security requirements and easily implement new configuration options.
After implementing and testing Fail2Ban we can now take a look at how to monitor and analyze the various failed authentication attempts and blocked IPs with the Fail2Ban-client.
Monitoring With Fail2Ban-Client
One of the greatest advantages of using Fail2Ban is that it allows us to actively monitor all the failed authentication attempts and the various IP addresses that have been blocked so far. This information is extremely helpful as it can help us understand the scale of attacks we are facing and the geolocation of the attacks by analyzing the origins of the IP addresses.
We can use the Fail2Ban-client tool to check the status of Fail2Ban and the active jails, this can be done by running the following command:
[simterm] $ sudo fail2ban-client status [/simterm]
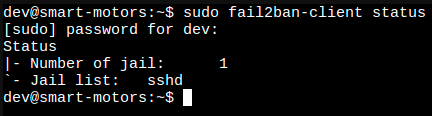
As shown in the image above, the active jail list is displayed with the names of the respective jails, in our case we can see that the sshd jail is active.
To view the status and information regarding a particular jail like sshd, we use the following command:
[simterm] $ sudo fail2ban-client status sshd [/simterm]
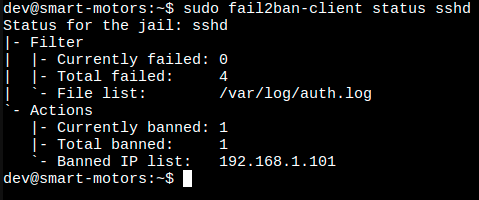
The image above shows us the status and information regarding the sshd jail, we can see that we have 4 total failed authentication attempts and one banned IP address. This is extremely helpful as it can alert you to potential targeted attacks.
We have successfully been able to set up, implement, test, and analyze Fail2Ban for brute-force protection, and we have completed setting up our remote authentication security.

