What is phpMyAdmin?
phpMyAdmin is a free, open-source, and cross-platform PHP-based web application that offers a simple, powerful, and convenient browser-based GUI for interacting and working with MySQL databases
It makes the process of creating, modifying, and configuring MySQL databases simpler and much more efficient.
Why should you secure phpMyAdmin?
phpMyAdmin is widely adopted and used in both production and development environments by both developers and system administrators. It is therefore a vital component to secure, given the nature of the data it is used to create and manage.
phpMyAdmin Features
These are some of the core features of phpMyAdmin:
- Execute standard SQL queries.
- Create, modify, and remove users and user permissions.
- Create, modify, and remove databases, tables, rows, and fields.
- Search for objects in databases and tables.
- Back up your MySQL databases.
Prerequisites & Requirements
In order to install and secure phpMyAdmin, you need to have a Linux server with the following services running:
- Apache2
- MySQL
- PHP
Note: This demonstration has been performed on Ubuntu 18.04; all techniques demonstrated are distribution agnostic with the exception of package names and package managers.
Installing phpMyAdmin
phpMyAdmin can be installed by running the following command in your terminal:
sudo apt install phpmyadmin php-json php-curl php-mbstring php-zip php-gd
During the installation process, you will be prompted to specify the web server technology you are using. Ensure that you specify Apache as the default web server.

You will also be prompted to specify an application password for MySQL, ensuring that you use a strong password.

After installing phpMyAdmin, you will need to enable the PHP mbstring module. This can be done by running the following command in the terminal:
sudo phpenmod mbstring
After enabling the mbstring module, you will need to restart the Apache2 service. To restart the service, run the following command in the terminal:
sudo systemctl restart apache2
Creating a MySQL user
It is always recommended to create a separate database user for each application and to avoid using the root user account.
To create a new MySQL user, we can log in to MySQL with the following command:
sudo mysql -u root
After logging in, we can create a new user by running the following command:
mysql> CREATE USER 'user'@'localhost' IDENTIFIED WITH caching_sha2_password BY 'password';
Note: Ensure that you replace the variables user and password with your own values.
After creating the user, we need to assign administrative privileges. This can be done by running the following command:
mysql> GRANT ALL PRIVILEGES ON *.* TO 'user'@'localhost' WITH GRANT OPTION;
After granting the new user administrative privileges, we can now exit MySQL by running the following command:
mysql> exit
Note: It is recommended to disable root logins or to change the root username to one that is difficult to guess.
Configuring phpMyAdmin to Work With Apache2
We can now begin the process of configuring and enabling phpMyAdmin to work with Apache2. We can do this by following these procedures:
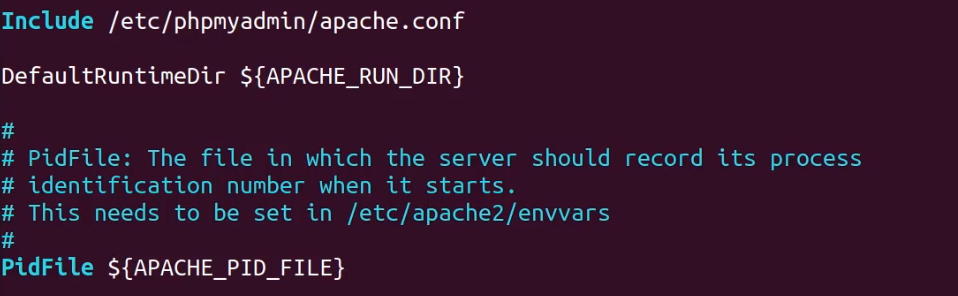
To enable phpMyAdmin access with Apache2, you will need to include the phpMyAdmin configuration file in the default Apache2 configuration. This can be done by editing the configuration file found in: /etc/apache2/apache2.conffile:
vim /etc/apache2/apache2.conf
To include the phpMyAdmin configuration file, add the following command to the /etc/apache2/apache2.conf file:
Include /etc/phpmyadmin/apache2.conf
The amended configuration should look like this:
After saving the file, you should restart Apache2 and try accessing phpMyAdmin from your browser, with the following URL: https://<SERVER IP>/phpmyadmin. You should be greeted with the following page:
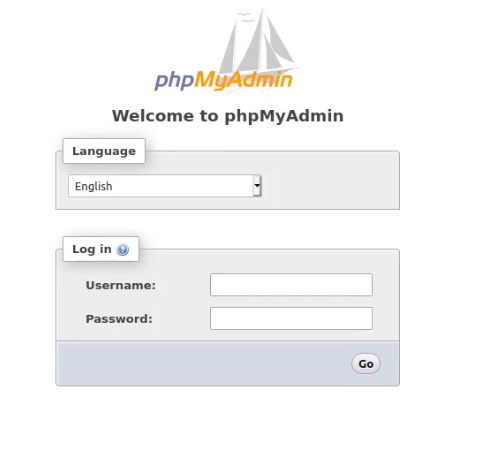
phpMyAdmin should now be working, and you can log in with the user you created earlier.
Changing phpMyAdmin Alias
The first step in securing phpMyAdmin is to change the default directory alias that is used to access phpMyAdmin. By default, any user can access phpMyAdmin by accessing the server URL: https://<SERVER IP/DOMAIN>/phpmyadmin.
This poses a security threat as attackers are aware of the directory name and can access it without restriction.
To mitigate this, we can perform the following actions:
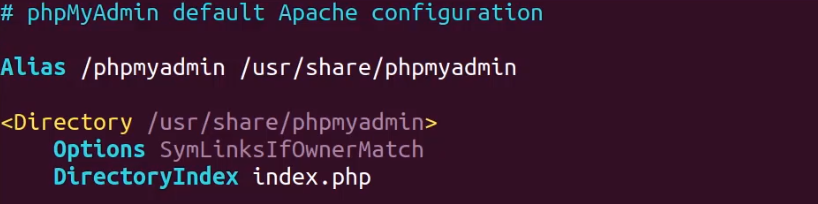
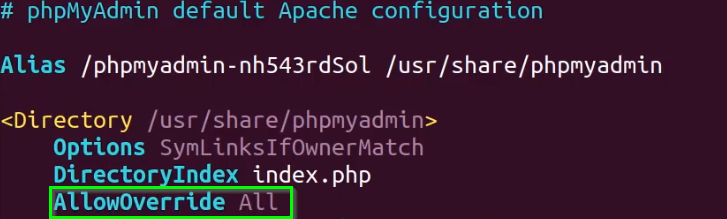
We can mitigate 80% of attacks by changing the default directory alias for phpMyAdmin. This can be done by modifying the /etc/phpmyadmin/apache.conf file. You can use any editor to make changes.
The file will already have a default alias name; the objective is to change it to another name that is difficult to guess or brute force.
It is recommended to use a random string generator to generate a suffix for the alias name, as illustrated in the image below. You can also use another agnostic directory name; however, this may also be guessed by attackers.
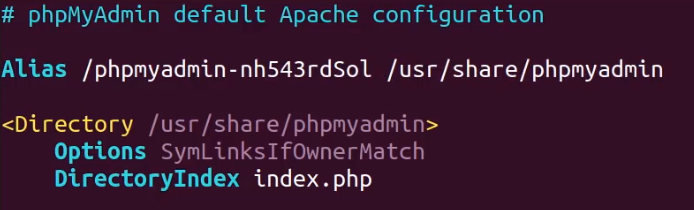
As demonstrated in the image above, this directory name will be much harder to guess or brute force as it follows no standard naming conventions utilized by Apache2 or known to attackers.
After changing the alias, restart Apache2 to apply the changes.
phpMyAdmin should now be accessible with your browser under the new directory/alias name.
Setting up Password-Based Authentication
As an added layer of security, we can also leverage the Apache2 authentication functionality to integrate a username and password authentication form that will be configured to protect the phpMyAdmin directory/URL. This can be done by following the procedures outlined below:
We first need to add the AllowOverride option under the directory configuration in the phpMyAdmin apache2 configuration file found in /etc/phpmyadmin/apache.conf. This will allow us to override any Apache2 configurations that are specified in the .htaccess file.
vim /etc/phpmyadmin/apache.conf
We can now set up the Apache2 authentication by creating the .htaccess configuration in the default phpMyAdmin directory found in i. After creating the file, you can specify the authentication configuration as listed below:
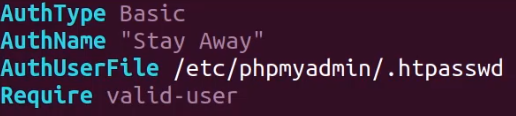
After creating the configuration, we now need to create the user and password for the authentication form, as specified in the image above. The .htaccess file that contains the credentials will be stored under the “/etc/phpmyadmin/” directory.
To create the user and password, we will use the htpasswd utility as outlined below. Ensure that you specify a hard-to-guess username.
sudo htpasswd -c /etc/phpmyadmin/.htpasswd <user>
You will be prompted to specify your password. Ensure that you use a strong and secure password.

You can now restart Apache2 to apply the configuration and activate the authentication.
To test the authentication, try accessing the phpMyAdmin directory in your browser. You will be prompted to enter the username and password combination you had specified earlier. Successful authentication will grant you access to phpMyAdmin, and a failed authentication will block access.
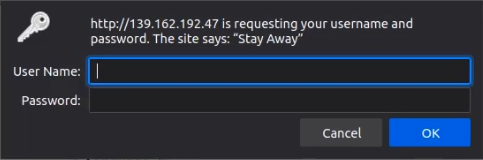
This is a great deterrent for attackers as it adds a second layer of security, also known as two-factor authentication.
Restricting Access To A Specific IP Address
An additional security measure you can take is to restrict phpMyAdmin access to a specific IP or a set of IP addresses. This is a great security configuration if you have a static IP that does not change; however, if you use a dynamic IP configuration, you may find yourself locked out, as your IP may have changed.
To configure IP-based restriction, follow the procedures outlined below:
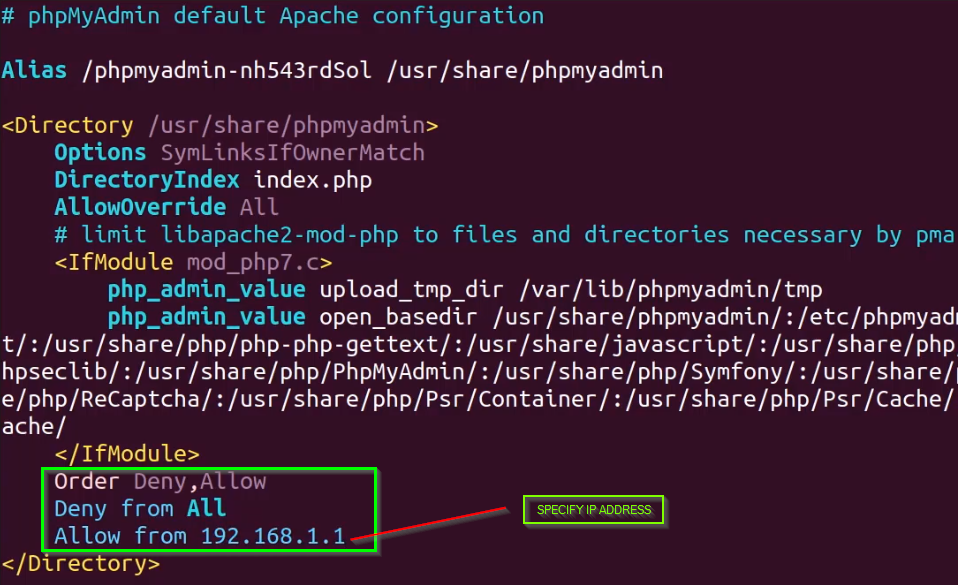
IP-based access and restriction can be configured in the /etc/phpmyadmin/apache.conf file, under the directory configuration.
To deny access to all IPs and grant access to a specific IP or subnet, add the following configuration, illustrated below, while taking precautions to substitute the IP with your own IP or IPs.
After adding your own IP address configuration, you should restart Apache2 to apply the configuration.
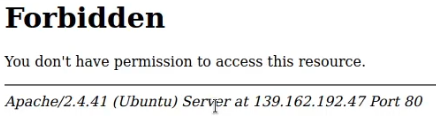
This will deny access to all except those who have or match the IP address you have specified. If an unspecified IP address attempts to access phpMyAdmin, they will receive the following response.
Custom PHP Configuration
We can also add specific PHP configurations to make phpMyAdmin much more secure by stripping all server or system information and by modifying the cookie authentication parameters.
To configure the custom PHP options, follow the procedures outlined below:
To add our custom PHP options, you will need to modify the /etc/phpmyadmin/config.inc.php file.
Within the file, we will specify a section for our custom configurations as illustrated in the image below.
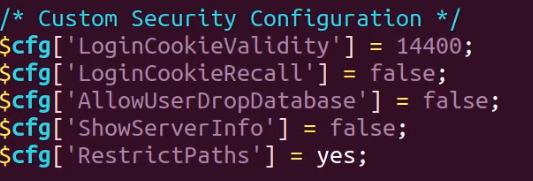
This configuration will change the default cookie validity time, automatically logging users out after a predefined period of time, and it will also prevent users from deleting databases and will omit server information from phpMyAdmin.
After adding the configurations, restart Apache2 to apply the changes.

